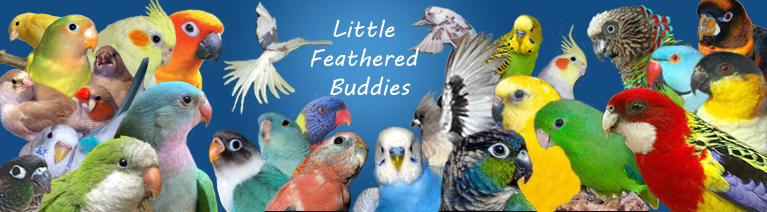
Bird Care
How to Clip Wings
If you have never done this before, you should take the bird to the vet and observe how they do it. This page did not come into existence for first-timers to attempt this procedure on their own, but for closer inspection on how it is done after one has watched an expert do it. Like nail trimming, it is also an easy process, but if not done correctly, it can have its consequences. If done incorrectly, the bird can end up injured (either by a blood feather breakage or because of bruises from dropping like a rock).
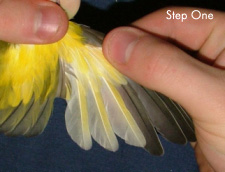
Step One: Hold the bird in a towel. This will keep the bird from seeing what is happening to an extent and keep the bird from biting you so you can have a steady hand to make a nice clean cut. Also, towels can act by way of distraction - some birds cannot help but chew on the towel. You can also hold the bird with your bare hands. Using bare hands will allow you to hold the bird longer before he gets over heated and also you can feel to the extent of your grasp - whether you are holding him too tighty or too loose. When you have a hold of the bird, spread his wings out fully. If you cannot hold the bird and spread his wings out with one hand, using the other hand to hold the scissor, then ask someone else to help you. Check for blood feathers (click HERE to read up on how to identify them).
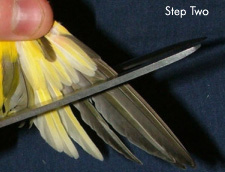
Step Two: After you are certain that the bird has no blood feathers (or if you do spot a blood feather and eyeball that you can cut around it) look for the primary flight feathers. This particular wing clipping demonstration is performed on a lovebird but all birds have primary flight feathers that are easy to spot and clipping is done exactly the same way. Primary flight feathers are the feathers furthest away from the body when the wing is fully outstretched. They are longer than the rest of the feathers on the wings and used during flight to obtain height.
Place 4-5 primary flight feathers between the blades of the scissors but do not cut yet. Make sure that the scissors are positioned no less than 1cm from the base of primary flight feathers. If you clip the wings too short, the bird be completely grounded instead of being able to hoover and glide - this can lead to a lot of injuries!
It is also worth mentioning that a sharp scissor should be use so as to make way for a clean cut. If the cut is jagged, it will annoy/irritate the bird because the edges will be poking the bird's side when he folds his wings.
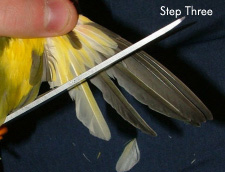
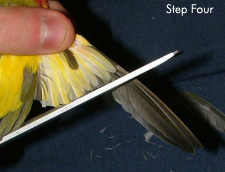
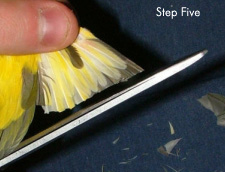
Steps Three - Five: Make a clean cut. Make sure you do clipping as evenly as you can on both wings. Some people believe that clipping one wing is adequate but this is dangerous because the imbalance will make air-navigation harder and may lead to serious injuries!
Debate and clarification regarding clipping
Question: Aren't you supposed to leave the first two primary feather alone (not cut)?
Answer: For larger birds, it is normally suggested that you do not cut the first two primary feather. This is because heavier birds need more of their primary feathers for take-off and if you make a clean cut (as demonstrated above) the bird may drop like a stone and not even be able to hover. For smaller birds, such as budgies, lovebirds, parrotlets, tiels, and finches, making a clean cut is ideal. If you do it properly (as mentioned above) they should not drop like a stone and be able to hover. Remember that smaller birds can fly with less of their wings because of their light weight, so if you leave the first two primary feathers untouched, it defeats the purpose of clipping! Final note, it is generally not recommended that canaries be clipped because they are not hands-on type of birds and should be allowed full flight to fly around the cage.